The Command Prompt

This article has an accompanying YouTube video, here.
In order to discuss the command line, we are going to need a command line environment to use. This article introduces core concepts and vocabulary pertaining to the Command Prompt. If you are a detail oriented person, you may be best served skimming this article now, and then returning to it later for more detailed reading once you have a little more context.
Opening a Command Prompt
Let’s start by opening up a Command Prompt window. You can open it in any of
the usual ways: the name of the program is Command Prompt and the name of the
executable file is cmd.exe.
A quick and easy way to launch those program is to use the Windows “run” dialog. Hold down the Windows key on your keyboard (it will have a Windows logo on it, usually) and strike the “r” key. This should open up the dialog. Type the text “cmd.exe” into the text box, so that it looks like this,
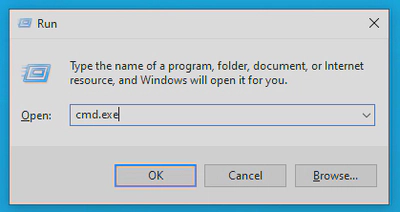
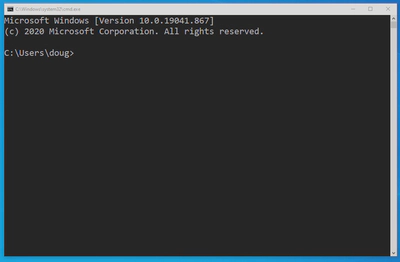
and then either strike the ENTER key, or press the OK button. This should launch a Command Prompt window for you, which looks like this,
Shells and Terminal Emulators
I should at this point mention that we’re technically working with two different pieces of software here. Command Prompt, or “cmd.exe”, is a type of program called a shell. A shell is a lot like a language, in that it governs the names and structures of the commands we can issue to the computer. However, the shell itself is running “inside” of another program called Windows Console, which is a terminal emulator. The terminal emulator is what draws the window, manages font sizes and colors, etc.
It is possible to install different terminal emulators, such as Windows Terminal, that support additional features, but still run the same Command Prompt shell. If you try to enter the commands we discuss into a different shell, such as Bash, you may encounter errors. However, if you enter them into Command Prompt, they should work, regardless of what terminal emulator is being used.
Terminal Text Buffers
Terminal emulators usually have two buffers, one for input and one for output. A buffer is a temporary storage space for data (often text). You will often hear the word in context to programming in languages that involve manual memory management, where you must create buffers to store data, or in reference to text editors, where the text shown on screen is stored in a buffer.
The Output Buffer
The output buffer, also sometimes called a screen buffer, contains the text that is displayed in the terminal window. For example, in Figure 1, the output buffer of the terminal contains the following text,
Microsoft Windows [Version 10.0.19041.867]\n
(c) 2020 Microsoft Corporation. All rights reserved.\n
\n
C:\Users\doug>
Note the use of the special character, \n in a few places above. While this
looks like two characters, a \ and an n, these two symbols together
represent a single character. This is one of many similar characters, made
up of a backslash followed by a letter, which are called escape sequences.
Generally speaking, an escape sequence is a pair of characters, always starting
with a backslash, that actually represent a single character. The \n escape
sequence represents a “new line” character. Its presence in the output buffer
is what causes the terminal to break the line, and start a new one.
When the shell was started, it wrote all of the above data into the terminal’s output buffer. The terminal then displayed the contents of that buffer to us.
Of note, the C:\Users\doug> portion has a special name. It is called the
prompt, and will be written by the shell every time it is ready to accept
a new command. The exact contents of the prompt can be customized, as we will
see later. To the right of the prompt, when the terminal window is focused, is
a blinking cursor. This isn’t technically part of the output buffer, but I’ll
mention it here because it is displayed. This is the insert cursor, and
functions just like the one you’re probably used to from text editing or word
processing.
The Input Buffer
The input buffer stores text that you type into the terminal. It’s important to note that any text that you type into the input buffer will be automatically copied into the output buffer as well, so that you can see it! The next character typed into the input buffer will appear at the current location of the cursor, as you would expect.
Try this now, select the terminal window and mash some keys at random (but don’t strike the ENTER key just yet). You may wind up with something that looks like this,
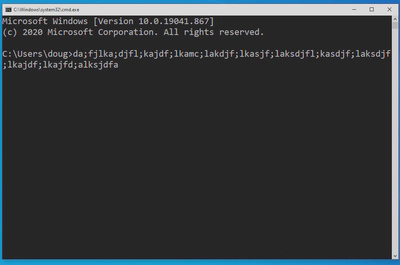
In this case, the input buffer contains the characters
da;fjlka;djfl;kajdf;lkamc;lakdjf;lkasjf;laksdjfl;kasdjf;laksdjf;lkajdf;lkajfd;alksjdfa
Note, and this is important, that there is no \n character in the input
buffer, even though the text appears to wrap onto the next line in the terminal
window. This is an example of a soft break, a linebreak added automatically
by the terminal for formatting purposes (to keep the text from flowing off the
side of the terminal window). Such soft breaks are not actually present in the
input buffer, and will not have any effect on how the shell processes the
command. They are only there for our convenience.
In addition to being able to see the contents of the input buffer on the terminal window, we can edit them. This works how you might expect: you can move the cursor about the buffer using the LEFT and RIGHT arrow keys, and the BACKSPACE and DELETE keys will have their usual effect.
However, if you press the DOWN arrow key, you may note that nothing happens, and if you press the UP arrow key, all the text next to the prompt will disappear. This is because the UP and DOWN keys are not used to navigate within the buffer, but to navigate command history, previous versions of the input buffer that were submitted to the shell for processing.
Executing a Command
Once the contents of the input buffer have been arranged to your liking, you can submit the buffer to the shell for processing by striking ENTER. This will copy the text contained within the input buffer to the shell, which will evaluate it and write any responses/results to the terminal’s output buffer, so you can see it. Then, once the command has finished executing, the shell will write another copy of the prompt to the output buffer, indicating that it is ready for a new command. If you do not see a new prompt appear, that means that the shell is still processing the previous one, and isn’t ready for new instructions yet.
Striking ENTER to submit the gibberish typed above will result in the following,
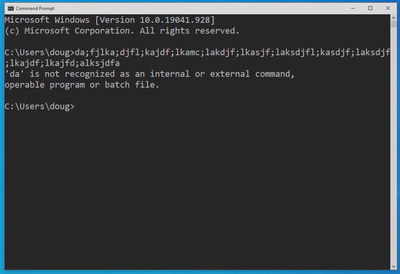
The text in the output buffer directly below the command we submitted contains the response from the shell, as well as the new prompt. Namely,
'da' is not recognized as an internal or external command, operable program or batch file.\n
\n
C:\Users\doug>
This is an error message you will likely be seeing often as you get started. It means exactly what it says: the shell didn’t know what to do with the command that you entered. Which, here, makes perfect sense; we just gave it a bunch of gibberish.
Control Sequences
Some commands won’t complete on their own. For example, the sort command
belongs to a special class of commands called filters, which we will
discuss in detail later. These commands require additional data to be entered
for them to do anything. Running the sort command will result in the
following,
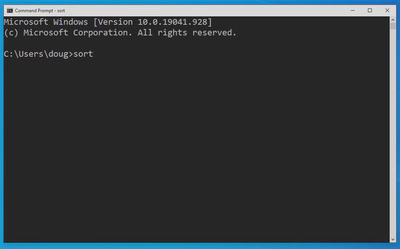
Notice how no new prompt has been displayed? This means that the sort command
has not released control of the shell. As a result, anything we type into the
input buffer at this point will not be interpreted by the shell when we strike
ENTER.
To release control of the shell from the command, we have two options. Both of these involve a special type of key combination called a control sequence, which take the form of the CTRL key combined with some other key.
It is common to use a special notation to indicate these, which takes the form
of ^_, where ^ indicates that the CTRL key should be held down, and _ is
replaced by a capital letter, indicating the key that should be pressed. For
example, ^C is a control sequence that is entered by holding down CTRL, and
then striking the C key.1
Keyboard Interrupt
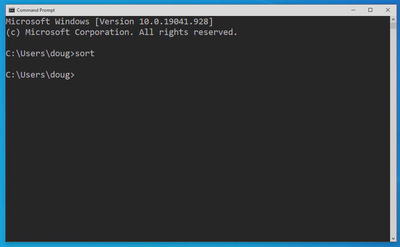
The nuclear option, which will work to regain control from the majority of
recalcitrant commands, is to issue a keyboard interrupt, by holding CTRL
and striking the C key (^C). This combination tells the shell to end whatever
command it is currently running and return to a neutral state, ready to accept
the next command. The result of entering this sequence is this,
The keyboard interrupt is a very useful tool. It will allow you to cancel a command if it is running for longer than you intended, or if the command crashes and refuses to end on its own. This latter case comes up particularly often when you are starting to learn how to program, and accidentally write an infinite loop.
Be aware, however, that using a keyboard interrupt is similar to using Task Manager to terminate a program. It will stop the command, but it won’t necessarily do so cleanly. If you care about the output of the command, and you know it hasn’t crashed or failed, you should avoid this option if possible.
End of File
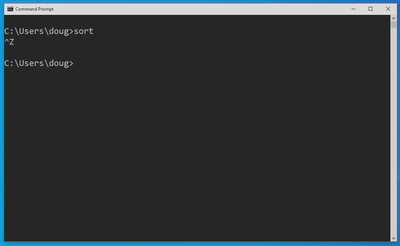
The second approach, which will work for the majority of commands that expect
input data, is to tell the command that there is no more data forthcoming. This
is done by sending the end of file (EOF) control sequence, ^Z.
On Command Prompt, this works slightly different from the keyboard interrupt
in that entering this control sequence doesn’t have an immediate effect.
Rather, it places a special EOF character into the terminal’s input buffer
(represented in the output buffer as ^Z). Thus, you will need to strike
ENTER, after entering the control sequence, for the EOF character to get passed
to the shell and have its desired effect.2
This approach is far more graceful than using a keyboard interrupt, and is the
appropriate way to terminate commands like sort. However, it will only work if
the command in question is set up to terminate on EOF, and has not crashed.
Conclusion
In this article, we discussed some of the basic concepts of the Command Prompt. When we are using Command Prompt, we are actually interacting with two separate programs: Windows Console (a terminal emulator) and Command Prompt (a shell). The terminal contains input and output buffers that facilitate our interaction with the shell, which interprets our commands.
A command is entered by typing it into the terminal’s input buffer, and then striking ENTER to send it to the shell. The shell will then interpret the command, and write any necessary output back to the terminal’s output buffer, where we can see it.
In addition to entering commands, we can also issue control sequences, which are
special combinations of CTRL with another key that have special meaning to the
shell. ^C is the keyboard interrupt, and will terminate most currently running
commands. ^Z causes the EOF character to be written to the input buffer, and
can be sent to the shell to cleanly terminate many programs.
We now know enough information about how the Command Prompt works to begin the process of learning some commands. In the next article, we will see many basic commands for manipulating files on our computer.
Glossary
- shell – a shell is a program that interprets and executes commands. Examples include Command Prompt, PowerShell, Bash, etc. Shells run inside of terminal emulators.
- terminal emulator – a terminal emulator is a program that manages your interaction with a shell. It accepts input and displays output from the shell, manages the appearance of text, etc.
- buffer – a buffer is a temporary holding area for data, often in the form of text.
- output buffer – the output buffer (also called a screen buffer) is a buffer in a terminal emulator that contains all of the text displayed in the window. The shell writes its output to this buffer by default.
- input buffer – the input buffer in a terminal emulator is a temporary holding area for commands or other shell input. It allows you to view and edit the command prior to sending it to the shell for processing by striking ENTER.
- prompt – the prompt is a sequence of characters written to the output buffer by a shell, indicating that it is ready to receive a command.
- soft break – a soft break is a linebreak created by the terminal emulator, but not actually present in the buffer. These are inserted to prevent text from running off the side of the window, but have no effect on command processing. Also called a soft return or a soft wrap.
- escape sequence – an escape sequence is a series of symbols, beginning with
a , that represents a single character. Often these
characters are used for formatting. For example,
\nis the escape sequence corresponding to a newline. - control sequence – a control sequence is a combination of the CTRL key with another key that indicates a specific operation for the shell to carry out, such as a keyboard interrupt.
- keyboard interrupt – a keyboard interrupt is a control sequence,
^C, that tells the shell to abort the currently running command. - end of file – a special character that indicates to a command that there is
no more input data coming. Usually abbreviated as EOF, and
represented by the control sequence
^Z.
-
Depending on the shell you are using, or the source you are referencing, you may see a mix of upper and lowercase letters used. I’ll be sticking with uppercase, as in
^C. The capitalization doesn’t have any bearing on how you enter the control sequence: never use the SHIFT key.^Cand^cboth mean the same thing, and should be entered by holding down CTRL and striking the c key. ↩︎ -
EOF is a handled a bit differently on Command Prompt than it is on the Bourne Shell and its derivatives (for you Linux/Mac users). On these shells, EOF is instead signified using
^D. Additionally, entering the control sequence will immediately send the EOF marker to the shell, rather than placing it in the terminal’s input buffer. This means that the effect should be immediate, and there is no need to strike ENTER after entering the control sequence. ↩︎